

A campaign can have a strong idea and still fall apart at launch. The problem is usually not creativity because the real issue is the small stuff that gets missed when the team is busy, and the deadline is close.
A strong marketing campaign launch checklist helps teams avoid preventable mistakes rather than creative ones. Many teams still lose a lot of time chasing updates while they switch between tools and manage work instead of focusing on real execution. Campaigns miss their goals because small execution details are overlooked such as missing UTM tags, broken mobile layouts, weak QA, untested forms, etc.
A launch checklist gives agencies a repeatable way to catch these issues before the campaign goes live.
Why Agencies Need a Repeatable Checklist

A campaign plan explains the bigger direction. It covers the strategy and timeline and defines the audience and channel mix. The plan may include budget dependencies and campaign goals.
A campaign checklist turns that plan into clear action steps. It shows what the team must complete before launching. It also covers what needs to happen during launch and after launch.
The Practical Difference
- The plan explains what the campaign is trying to achieve.
- The checklist makes sure nothing important gets missed during execution.
This difference matters because a campaign can look strong at the strategy level and still fail during launch. The audience may be clear. The offer may be strong. The creative may already be approved. Still, the campaign can underperform if basic launch checks are missed.
Small Misses Can Hurt Results
- A broken form can stop leads.
- A missing UTM tag can weaken tracking.
- A wrong audience setting can waste a budget.
- An untested landing page can reduce conversions.
- These issues can hurt the campaign before it gets a fair chance to perform.
The launch checklist runs smoother when kickoff inputs are locked early and shared with the full delivery team. Marketing project kickoff checklist helps keep that first handoff clean.
Agencies Face Higher Risk
For agencies, this risk is even higher because campaign work passes through many roles.
Account managers and strategists may handle the planning. Copywriters and designers may prepare the assets. Media buyers may set up the campaign. Developers may manage landing pages. Analysts may check tracking, and clients may handle final approval.
Without a repeatable checklist, each person may assume someone else has checked the final details. This is how small mistakes reach launch day.
What a Repeatable Checklist Helps Agencies Do Better
A repeatable checklist helps agencies in three practical ways.
- It reduces avoidable launch mistakes. A checklist keeps every small step in one place, so the team does not need to remember the full process each time.
- It improves handoffs between teams. When copy, design, tracking, approvals and launch checks sit in one workflow, the next person can quickly see what is ready and what is blocked.
- It makes campaign delivery easier to scale. Agencies managing multiple clients cannot rebuild the launch process for every campaign. A reusable checklist keeps quality consistent even when timelines are tight.
How to Create a Repeatable Checklist Your Team Will Actually Use
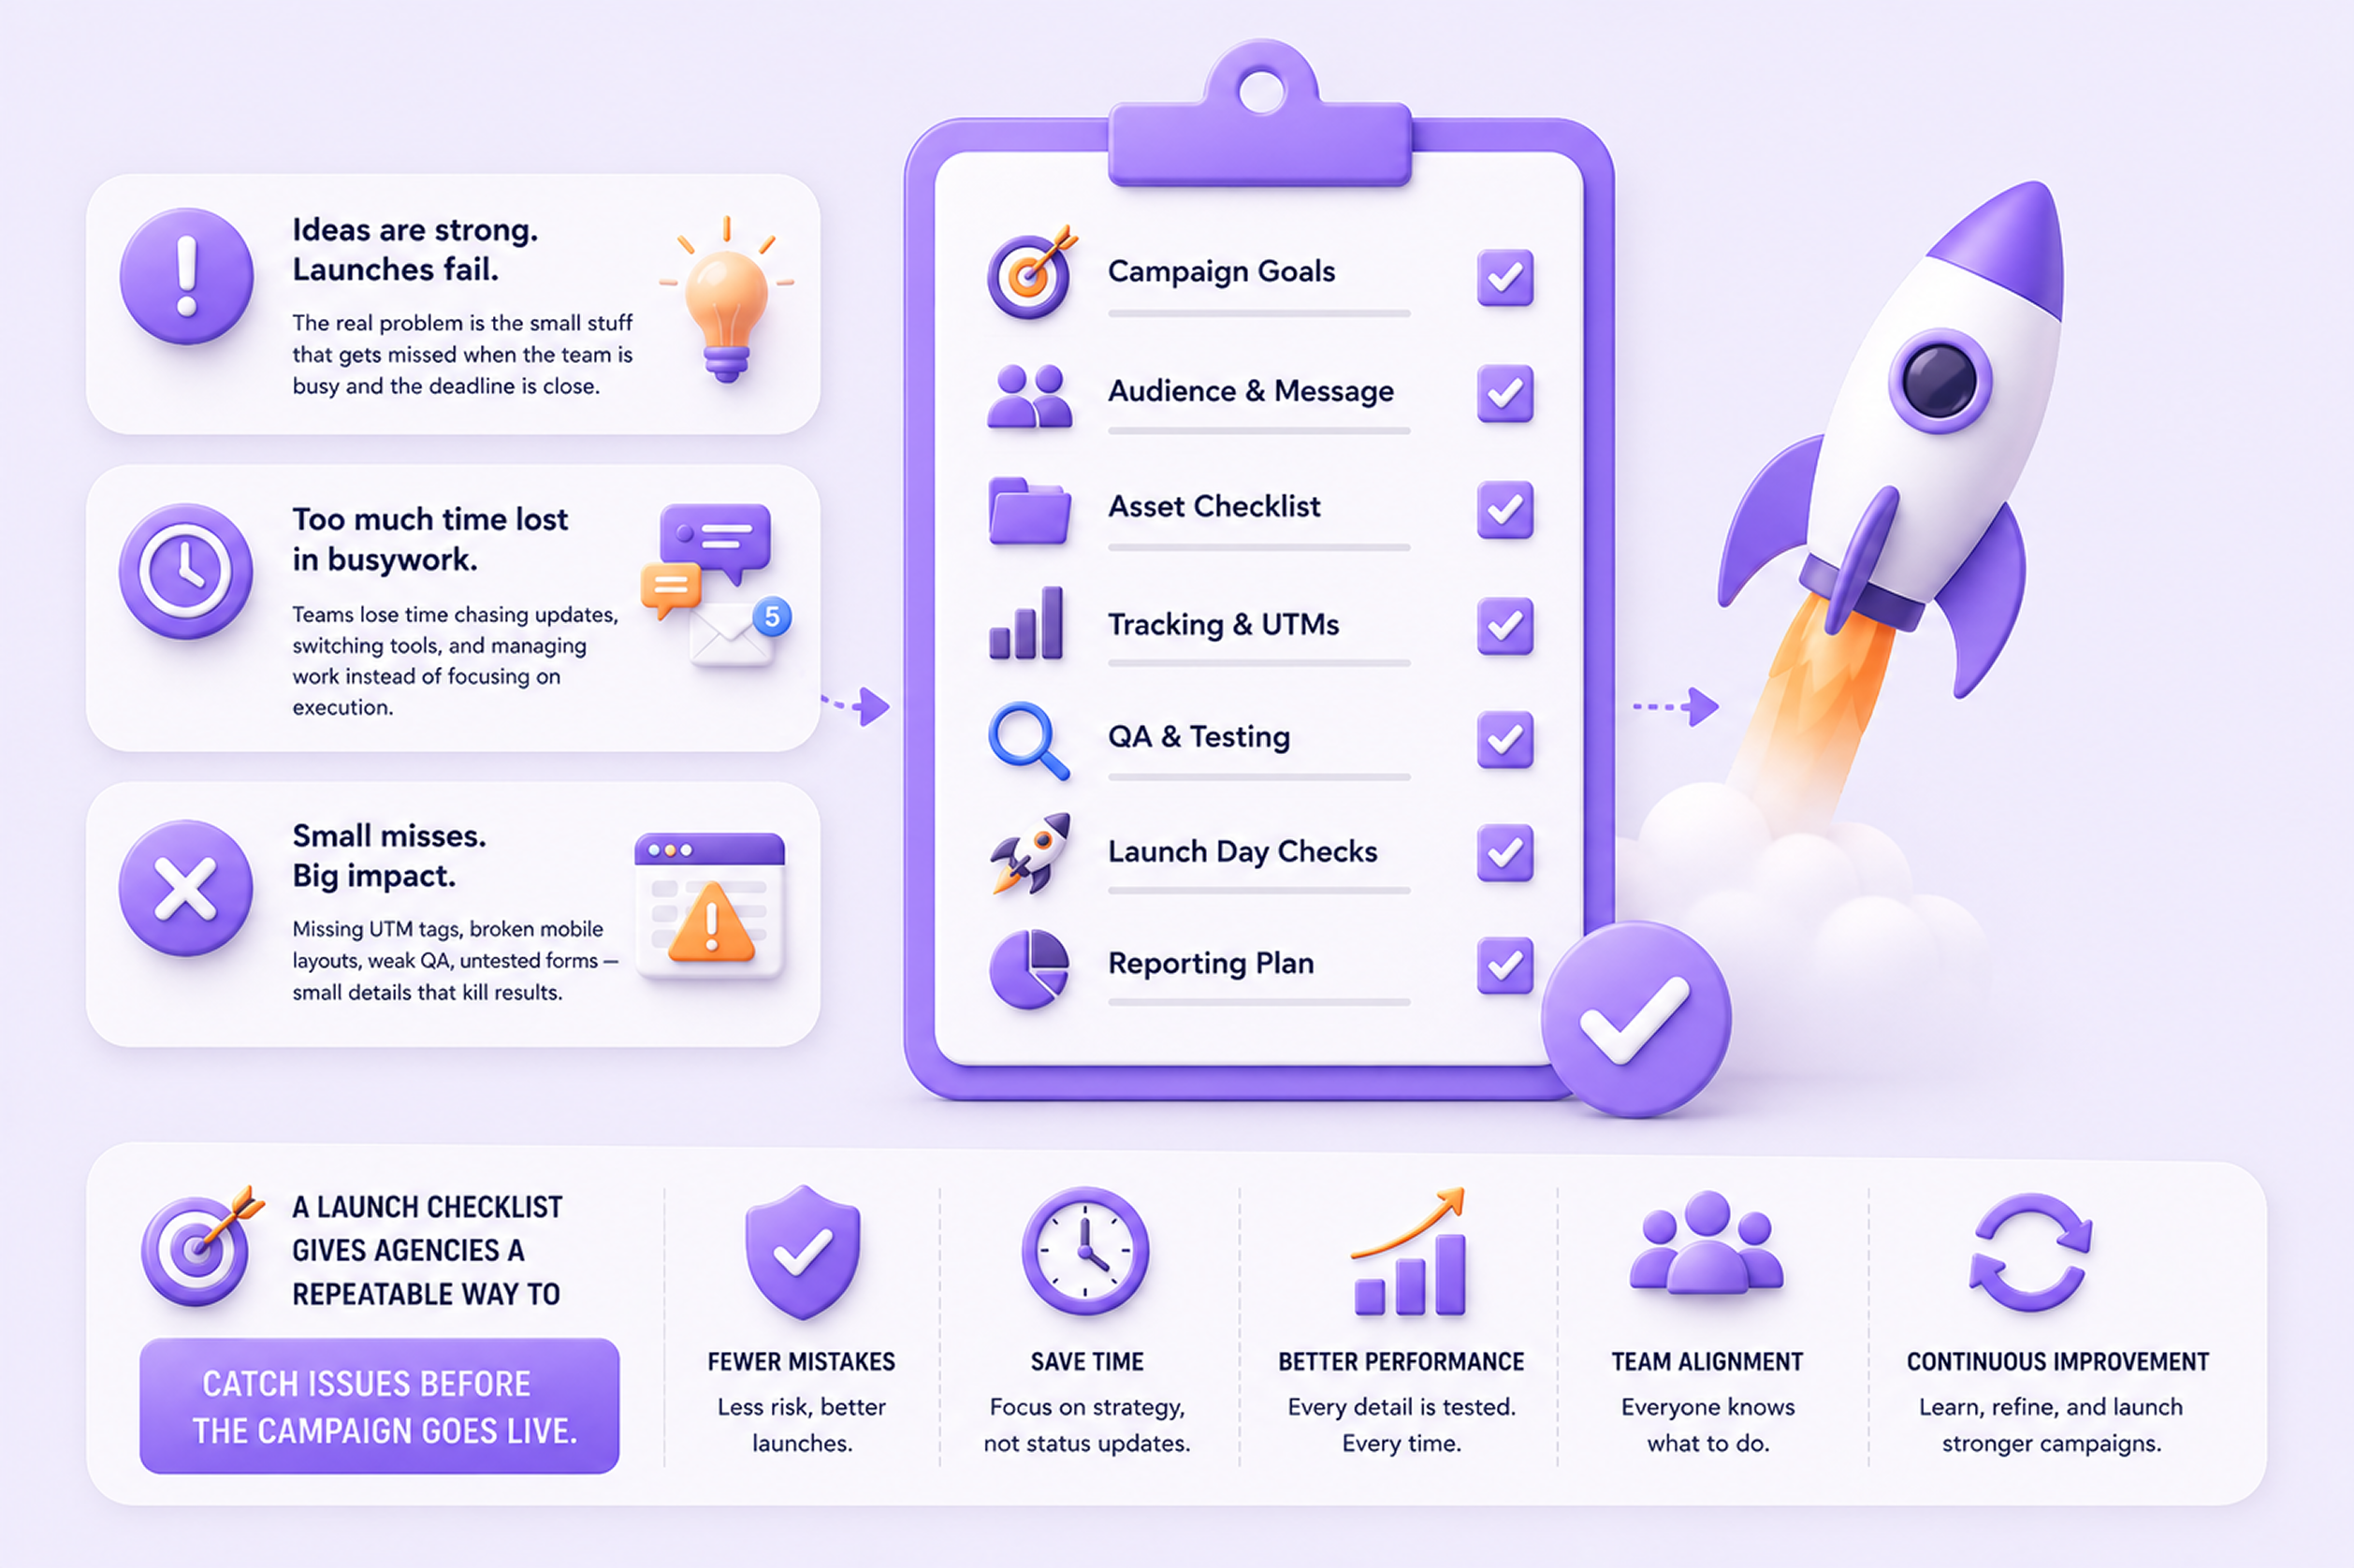
A useful checklist should be short enough to run and detailed enough to prevent costly misses. If it is too broad, people will skip it. If it is too detailed, it becomes another task nobody wants to update.
The best checklist matches the way the agency already works and makes each launch easier to manage.
Start With Phases, Not One Giant List
A single long checklist can quickly become confusing. So, preparing a robust pre launch marketing checklist is important. Team members may not know which tasks matter now and which ones can wait. A phase-based checklist solves that by grouping work around the campaign timeline.
A clean structure can include:
- Pre-production
- Pre-launch
- Launch day
- Post-launch monitoring
- Wrap-up and learning
This makes the checklist easier to follow because every phase has a clear purpose:
- Pre-production is used to plan the campaign core and lock the brief while confirming assets and budgets.
- Pre-launch covers QA and approvals along with tracking and final checks.
- Launch day focuses on live testing and early issue handling.
- Post-launch monitoring helps the team review performance and make quick fixes.
- Wrap-up is where results, learnings, and checklist updates are recorded.
This structure also helps account managers and project leads to sharing campaign status with more clarity. Instead of saying “the campaign is almost ready” they can give a more useful update like “creative is approved and tracking is still pending while launch-day QA has already been assigned.”
Many launch delays happen because one blocked dependency freezes the next step, like tracking, landing page, or approvals. Project dependencies help teams spot those blockers early.
Assign Owners Inside the Checklist
A checklist without clear owners becomes a wish list. It may show what needs to happen, but it does not show who is responsible for making it happen.
Every important checklist item should have one clear owner. This is especially important for tasks like:
- Final copy approval
- Creative export
- Landing page QA
- UTM setup
- Pixel or event tracking
- Media platform setup
- Client approval
- Launch-day monitoring
- Performance reporting
This structure also helps account managers and project leads share campaign status with more clarity. Instead of saying “the campaign is almost ready” they can give a more useful update like “creative is approved and tracking is still pending while launch-day QA has already been assigned.” A simple owner column can save hours of back-and-forth during launch week.
Keep “Must-Check” Items Separate From “Nice-To-Check” Items
Not every checklist item has the same level of risk. Some steps are essential because the campaign cannot launch safely without them while others are useful but optional.
A good checklist should separate critical launch items from supporting tasks, so the team knows what must be checked first.
Must-check items include:
- Final client approval
- Correct launch date and time
- Approved copy and creative
- Working landing page
- Correct CTA links
- UTM tags
- Pixel or event tracking
- Audience targeting
- Budget and pacing settings
- Form submission test
- Mobile QA
Nice-to-check items include:
- Extra creative variations
- Additional reporting notes
- Optional social captions
- Secondary audience tests
- Extra competitor checks
- Bonus internal documentation
This helps the team stay focused when timelines are tight. If every item looks equally important, then people may spend time on low-priority tasks while high-risk checks stay unfinished.
A simple priority field can make the checklist easier to use. Mark each item as Must-check Should-check or Optional, so the team knows what needs attention first.
Build the Checklist Around Real Campaign Risks
A repeatable checklist should do more than list tasks. It should capture the mistakes the agency has already seen and turn them into practical checks.
- If past campaigns had broken links, then add a link check step
- If client approvals often came late then add a clear approval deadline
- If tracking was missed, then add a UTM and pixel QA step
- If creative files were uploaded in the wrong size, then add a platform format check
This turns the checklist into a learning system because every campaign makes the next launch stronger. A useful review question is “What went wrong last time that should never happen again?” The answer should be added to the next checklist version.
Keep the Checklist Inside the Workflow
A checklist only creates value when the team uses it during real launch work. If it sits in a forgotten document, then it will not be updated when timelines become tight. A checklist only works when it sits inside clear marketing workflows that people follow every time. That is what turns it from a doc into real execution.
The checklist should live in the same place where the team manages tasks, timelines approvals and client work. Smaller teams can start with a shared sheet. Agencies managing multiple clients may need project management software for marketing agencies because owners’ due dates, comments, files and status updates stay connected in one workflow.
This also improves client communication. Account managers can see what is approved and what is pending without chasing every team member separately.
Review and Improve the Checklist After Every Campaign
A repeatable checklist should not stay fixed forever. After each launch, spend a few minutes improving it with real campaign feedback.
Ask these questions:
- Which step helped prevent a mistake?
- Which step was skipped?
- Which task needs a clearer owner?
- Which approval took longer than expected?
- Which QA check should be added?
- Which item no longer needs to be kept?
This keeps the checklist useful instead of being overloaded. Over time, it becomes a stronger agency process because it reflects real campaign experience instead of a generic launch template.
Phase 1: Pre-Production Checklist (2 to 4 Weeks Before Launch)
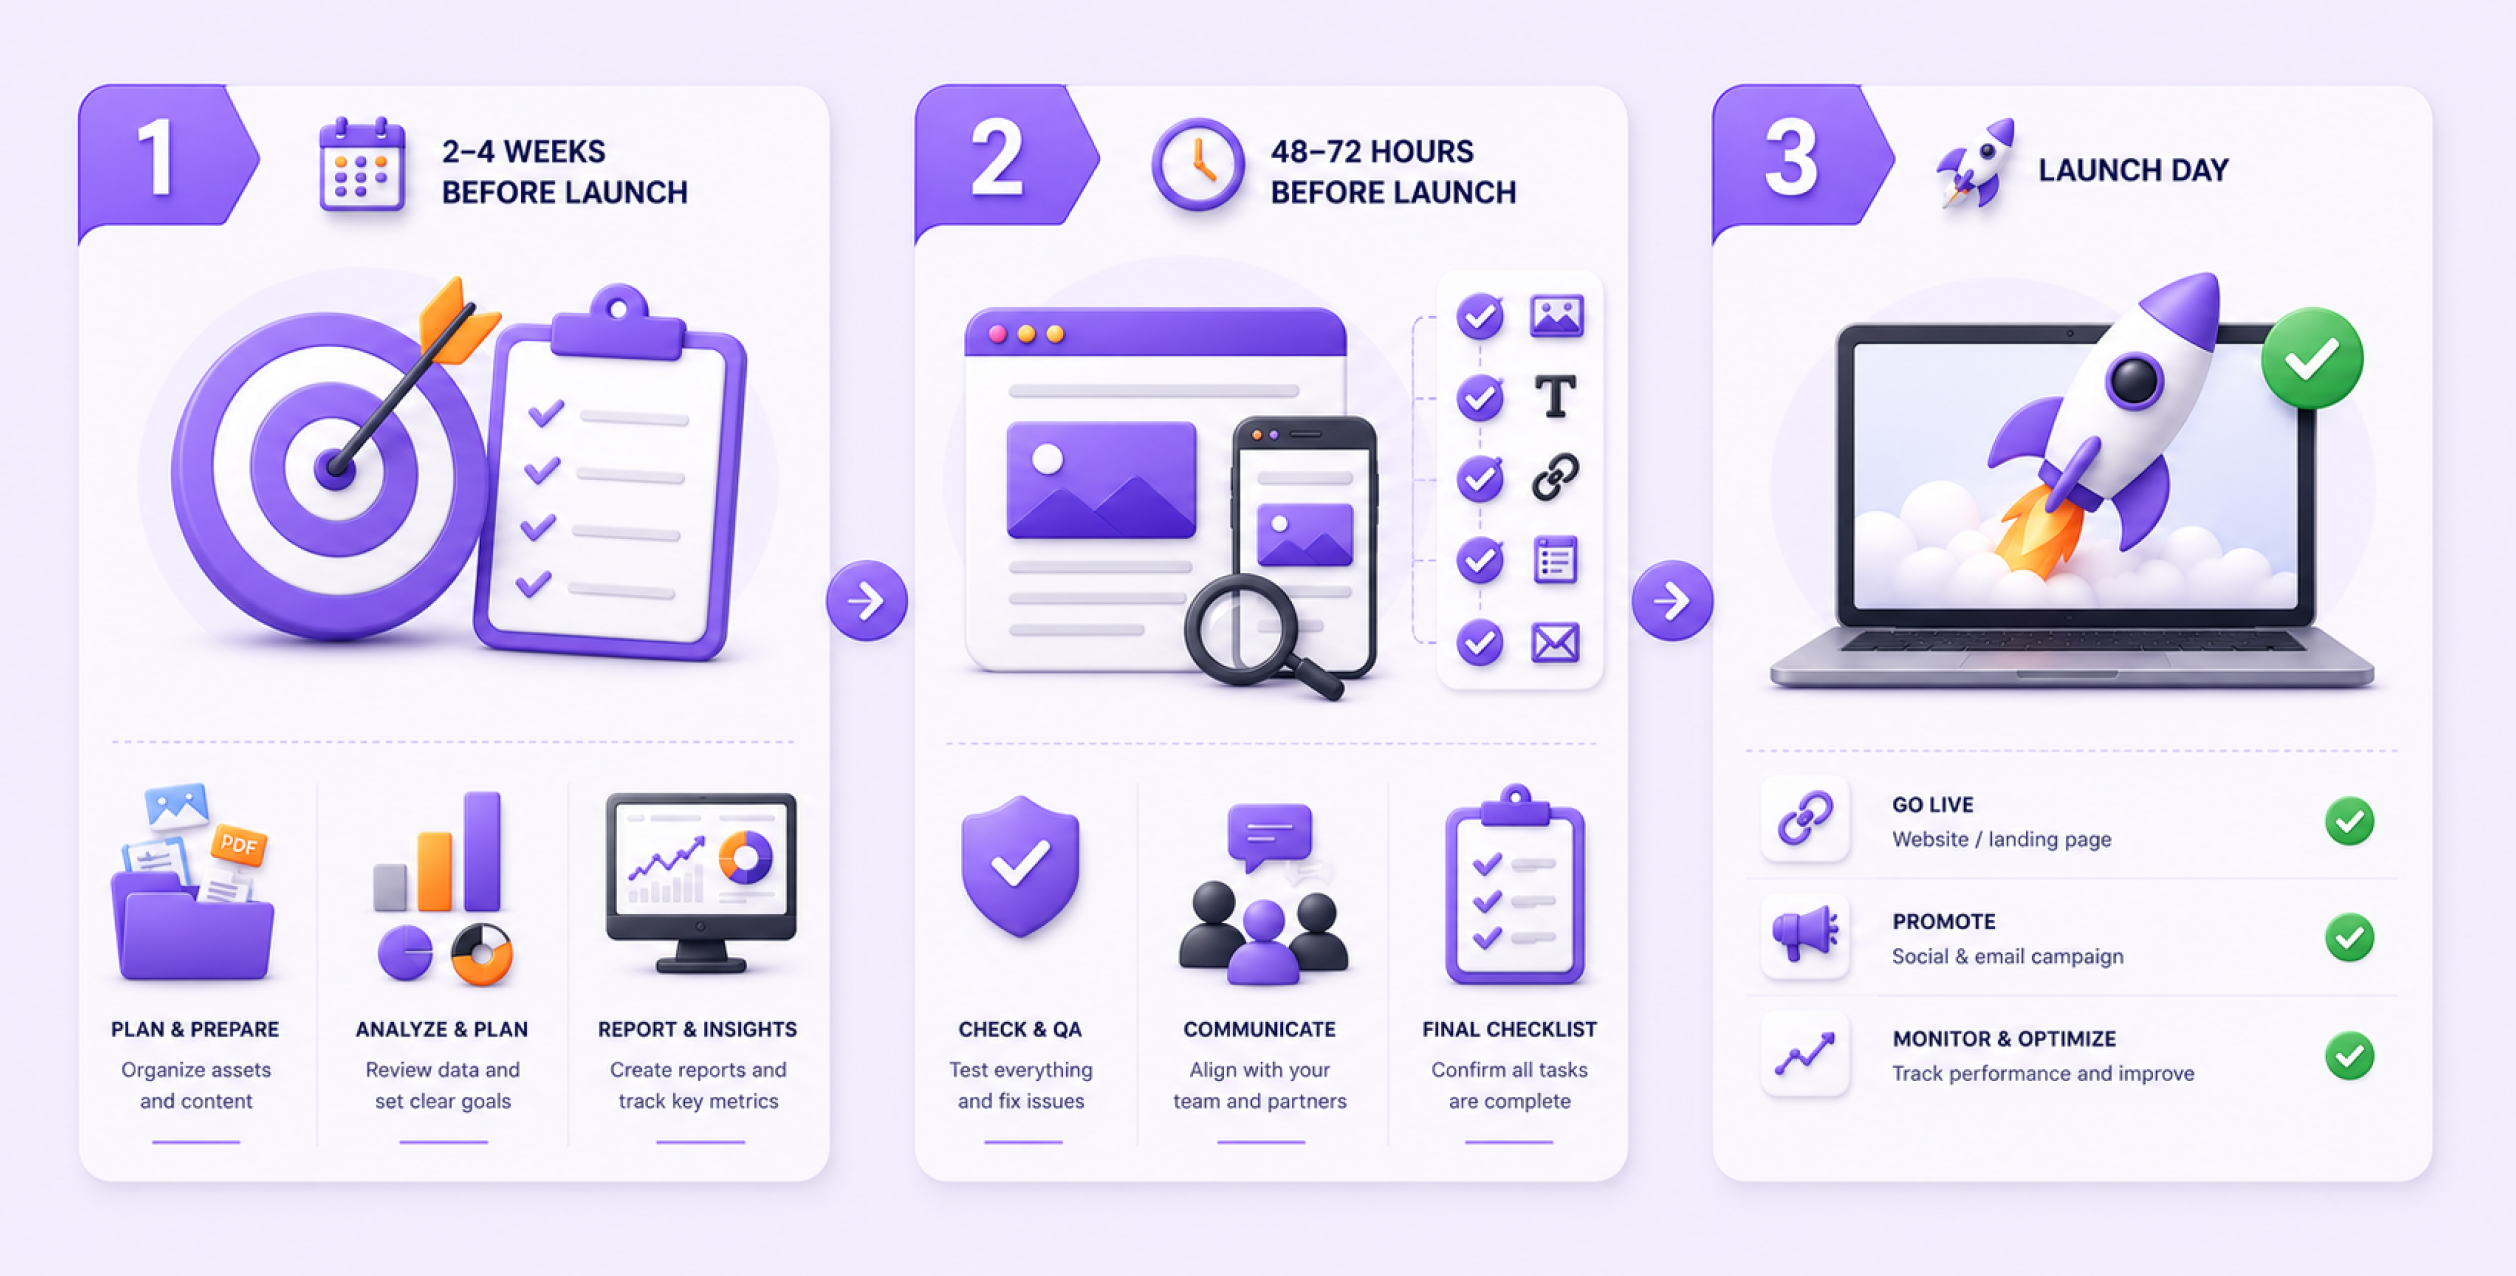
This phase is the foundation of a checklist to launch marketing campaign. It sets the campaign direction before assets start moving.
Define the Campaign Core
Start by locking the basics first:
- Campaign goal
- Primary KPI
- Target audience
- Key message
- Channels
- Launch date
A strong checklist should begin with objectives and core messaging before creative work starts. This keeps the campaign focused and gives every team member the same direction.
Build the Asset List
List every asset the campaign needs before production begins:
- Landing page
- Ad creative
- Email copy
- Organic social posts
- Sales collateral
- Internal FAQ or support notes
This is where many teams underestimate the work. If the asset list is unclear, then the checklist becomes weak later.
Set Tracking and Budget Early
Before launch week confirm the key performance and budget details:
- Budget by channel
- UTM structure
- Reporting dashboard
- Event and conversion tracking
- Retargeting pixels where relevant
Tracking and budget checks should not be left for the final day. When these details are confirmed early, the team can avoid last-minute errors during launch week.
Phase 2: Pre-launch Checklist 48 to 72 Hours Before Launch
This phase is for quality control and launch of readiness. The goal is to confirm that every asset works correctly before the campaign goes live.
Run Asset QA
Check the key campaign assets first:
- Ad sizes and formats
- Final copy and disclaimers
- Landing page responsiveness
- CTA links
- Form flow
- Thank-you page behaviour
One recent campaign checklist note that small misses can quietly damage performance. These include missing UTMs, untested email templates, poor mobile rendering, and weak form experience.
Confirm Approvals and Live Status
Make sure the final launch items are ready:
- Final assets are approved
- Placements are active or scheduled
- Ads are attached and active
- Tracking pixels are working
Adobe’s campaign launch checklist is clear on this point. Teams should verify active placements, correct goals, correct dates attached ads and functioning tracking pixels before launch.
Prepare Internal and Client Communication
A good checklist is really a risk filter that protects budget and tracking before the campaign goes live. Project risk management is a useful lens for your must-check items.
This is the time to confirm the communication flow:
- Who is monitoring the launch
- Who will receive launch updates
- Who will handle urgent issues
- What the escalation path is
Agencies lose time when launch-day communication depends on scattered chat threads. A clear communication plan keeps the team aligned when the campaign goes live. Launch day problems often start as communication problems, not creative ones. How to write a clear project communication plan fits the escalation and update flow you describe here.
Phase 3: Launch Day Checklist
Launch day should feel controlled and not rushed. This phase is where the team confirms that the campaign is live and working as planned.
Check Live Execution First
Once the campaign goes live verify the core launch items:
- Links work properly
- Ads are serving
- Email sends are correct
- Landing pages load properly
- Tracking events fire
- Forms submit without issues
Watch the First Signals
Do not wait for a full report before checking early performance. Review the first signals as soon as the campaign starts running:
- Spend pacing
- CTR
- Landing page behaviour
- Early conversion flow
- Broken creative or copy issues
Launch day is where planning meets real execution. Small fixes at this stage can protect the performance of the full week.
Log Issues In One Place
Log issues in one shared place so the team can act fast during launch day.
- Use one launch log for bugs blocked items and quick fixes
- Add the owner for each issue so responsibility is clear
- Track the status of each item in one view
- Mark urgent issues that need immediate action
- Use a marketing team project management platform when spreadsheets become hard to manage
- Keep owners status, files, comments and overdue items together so launch day feels calmer and faster
When the team can see owners’ status and overdue items in one view, launch day becomes calmer and faster.
Phase 4: Post-Launch Monitoring Checklist (Days 1 to 7)
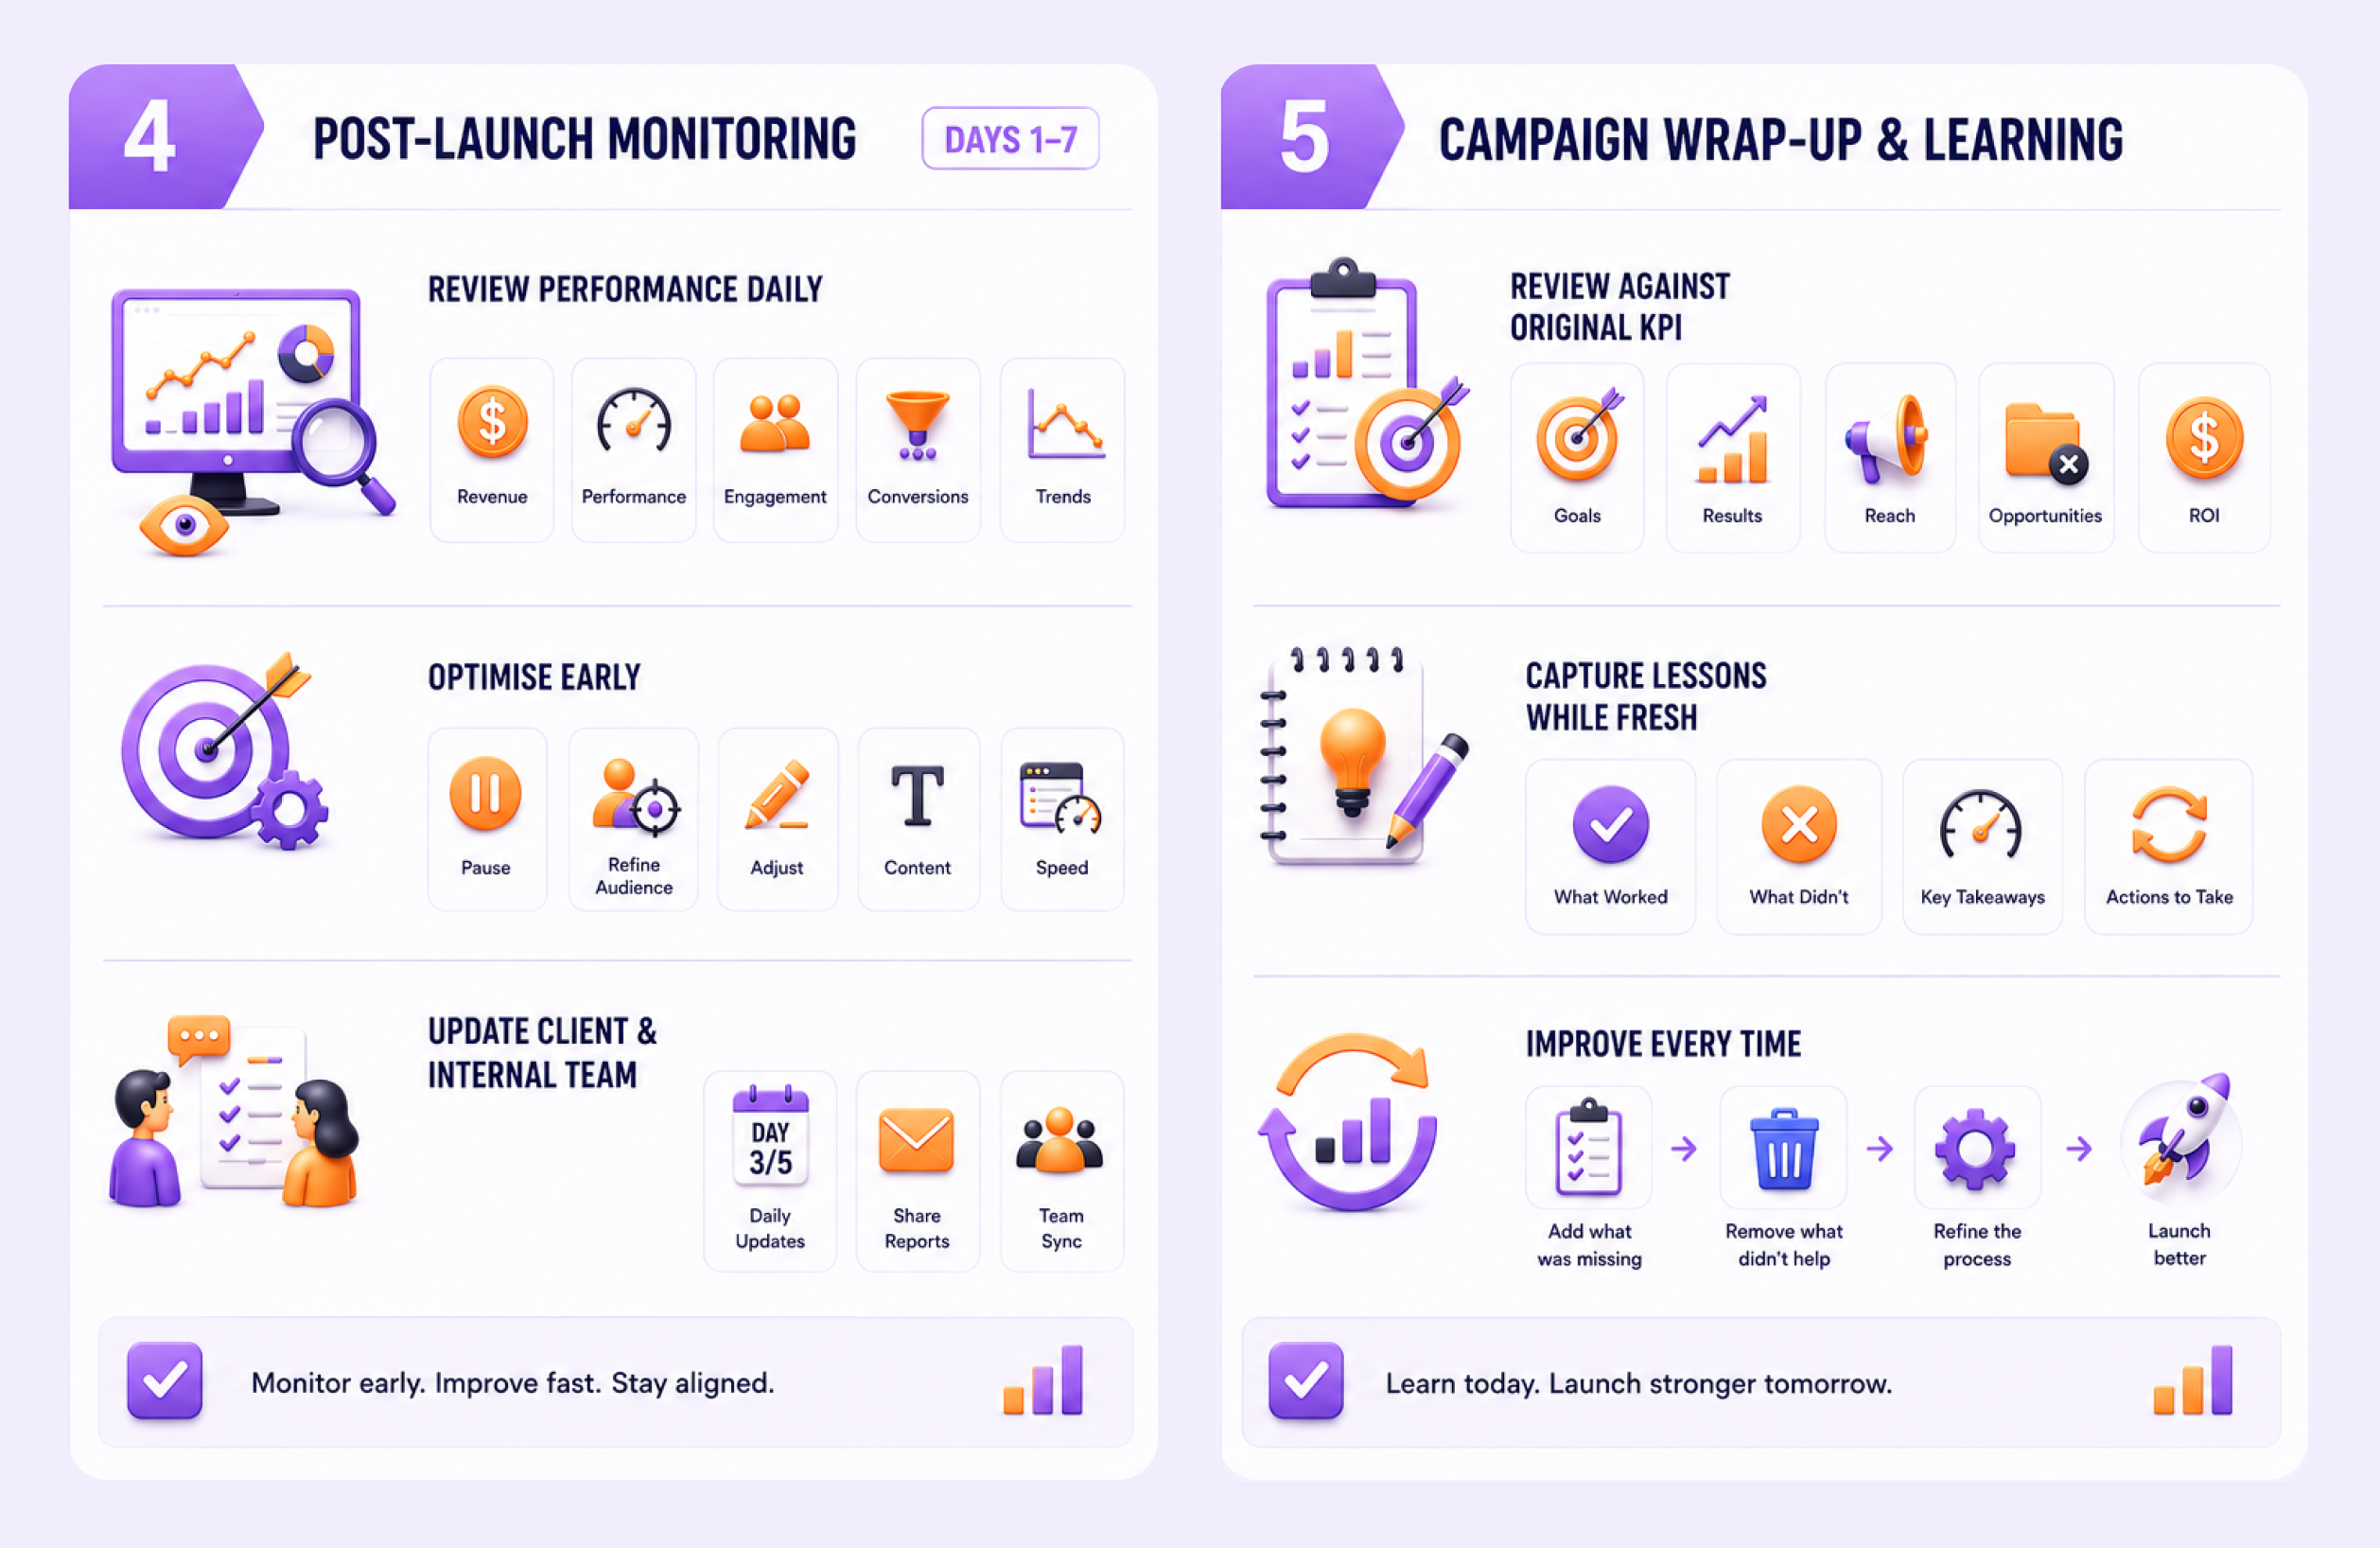
The campaign is live, but the work is not over. This phase helps the team spot early issues and improve performance before small problems become bigger.
Review Performance Daily
In the first week check:
- Spend against budget
- Channel pacing
- Lead quality
- Conversion quality
- Bounce or drop-off patterns
- Comments and replies on social or paid placements
A campaign checklist should continue after launch because results and feedback are part of the launch process. So, do not treat monitoring as an afterthought.
Optimize Early
The first week is the right time to:
- Pause weak creative
- Adjust targeting
- Fix weak copy
- Refine CTA language
- Reduce landing page friction
Update the Client and Internal Team
A short update on day 3 or day 5 keeps everyone aligned. It reduces reactive questions and helps build trust because the client can see what is happening and what the team is improving.
Phase 5: Campaign Wrap-up and Learning Checklist
This is the phase many teams rush even though it is where repeatability gets built.
Review the Campaign Against the Original KPI
Compare:
- Target KPI
- Actual performance
- Top performing channels
- Weak assets
- Budget efficiency
Capture Lessons While the Campaign Is Still Fresh
Document:
- What worked
- What failed
- What slowed the team down
- What should change next time
This step turns a campaign launch checklist into a process that improves with every launch. If a step is missing, then add it. If a step did not help then remove it. A strong checklist should evolve after each campaign instead of staying fixed.
5day.io supports this approach with reusable templates and multi-assignee task tracking while providing an easy dashboard for time estimate comparisons. These features help teams launch future campaigns faster and keep delivery more consistent.
These were the 5 phases of campaign launch checklist for marketing agencies.
Common Mistakes Agencies Make and How to Avoid Them
Even a strong checklist can fail if the team treats it like a one-time document. Most agency mistakes happen when the checklist is not connected to real campaign ownership, approvals, QA, learning, etc.
Let’s look at some of the most common mistakes that agencies often make:
Treating the Checklist Like the Full Plan
A checklist is not a full campaign plan. It does not replace strategy, audience research, budget planning, messaging, channel decisions, etc. It only helps the team execute the plan without missing important steps.
How to avoid it:
Build the campaign plan first. Then use the checklist to turn that plan into clear launch tasks.
Skipping Owner Fields
A checklist without owners creates confusion. Everyone can see the task, but nobody knows who is responsible for completing it.
How to avoid it:
Add one clear owner for every important task. Add reviewers and approvers only where they are needed.
Doing QA Too Late
Many teams check links, tracking, landing pages, forms, creative sizes, etc. only near launch time. This creates panic when something breaks.
How to avoid it:
Add QA during the pre-launch phase. Keep final launch-day QA only for live checks.
Pushing Approvals to Launch Day
Launch day should not be used for final client approvals. If approvals happen too late, the full campaign can be delayed.
How to avoid it:
Set approval deadlines at least 48 to 72 hours before launch. Keep launch day for testing and monitoring.
Ignoring Post-Launch Learning
Some agencies move to the next campaign without reviewing what worked and what failed. This makes the same mistakes repeatedly.
How to avoid it:
Add a short wrap-up step after every campaign. Note missed checks, delays, weak handoffs, useful fixes, etc. for the next checklist.
Keeping the Checklist in a Document Nobody Updates
A checklist hidden in a document will not help during launch week. Teams need live status, owners, comments, files, and deadlines in one place.
How to avoid it:
Keep the checklist inside the team’s real workflow. A tool like 5day.io can help agencies manage templates, owners, status updates, approvals, launch tasks, etc. in one shared system.
A checklist only works when it lives inside the team’s real workflow. This is why agencies often get more value when the checklist sits inside project management software for marketing agencies instead of a loose document.
For example, 5day.io connects campaign templates, launch checklists, status workflows, time estimates, and collaboration inside one shared execution system.
How to Make Your Campaign Launch Checklist Repeatable

A checklist becomes useful only when the team can use it again without rebuilding it for every new client or campaign. The goal is not to create a rigid document. The goal is to create a flexible launch system that keeps the same quality checks in place while allowing small changes based on campaign type.
Keep One Master Checklist
Start with one master version that holds the core launch process.
This should include the core steps every campaign need:
- Campaign goal
- Primary KPI
- Asset list
- Approval status
- Tracking setup
- Launch-day checks
- Reporting plan
- Wrap-up notes
Protect the master checklist so the core process stays clean. Do not let every team member edit it directly. If a new campaign starts, then copy the master checklist and adjust it based on the client channel and launch scope.
This keeps the agency process consistent and prevents the checklist from becoming messy over time.
Create Variations by Service Type
Not every campaign needs the same checklist. Paid ads launch SEO campaign, email sequence, webinar and social campaign will each need different checks.
Create smaller checklist versions for the service types your agency handles often. If the campaign is for paid ads, then the checklist can include audience setup, budget pacing, conversion tracking, and ad approval. If it is for email, then it can include subject lines, test sends, link checks, segmentation, and unsubscribe checks.
Checklist Version | Best Used For | Extra Checks to Add |
Master campaign checklist | All campaigns | Goal, KPI, approvals, tracking, launch QA |
Paid media checklist | Google Ads, Meta, LinkedIn | Budget pacing, targeting, pixels, ad status |
Email campaign checklist | Newsletters, nurture flows | Test send, links, segments, subject line |
Social campaign checklist | Organic or paid social launches | Captions, creatives, hashtags, post status |
Webinar checklist | Events and lead generation | Registration page, reminders, speaker assets |
Add Channel-Specific Checks Only When Needed
A repeatable checklist should stay useful without becoming too heavy. Add channel-specific checks only when needed. For example, UTM checks may apply to most digital campaigns while pixel QA may matter more for paid media. Speaker reminders are useful for webinars but not for blog campaigns.
This keeps the checklist easy to use while still detailed enough to prevent important mistakes.
Review the Checklist After Every Campaign
The best checklists get sharper through real campaign use. A checklist should not stay static after launching because each campaign reveals gaps in the process.
After every campaign review:
- What worked well
- What slowed the team down
- What was missed
- Which step created confusion
- Which owner field was unclear
- Which item no longer adds value
If a missing step cause confusion, then add it. If a task was ignored or did not help, then remove it. If ownership is unclear, then assign a clearer owner for the next launch.
This short review turns the checklist into a practical agency system that improves after every campaign.
Store It Where the Delivery Team Works
A checklist buried in a drive folder will not help during launch week. Keep it inside the same project management software for marketing agencies that the team uses for tasks, timelines, approvals, and client updates.
A checklist for your team updates is worth more than a perfect checklist nobody opens.
Conclusion
A strong marketing campaign launch checklist is not made to impress anyone. It is made to catch the details that often get missed when launch pressure builds.
When the checklist is phase-based assigned clearly and connected to the real workflow, it becomes a coordination tool instead of just another document.
This is where 5day.io becomes really helpful. There are reusable templates for campaign work, launch checklists, social scheduling, and client onboarding.
Its campaign and workflow guides also focus on assignees, estimates, approvals, dashboards, and shared visibility. For agencies that want a calmer project management setup around launches, this becomes a practical next step.